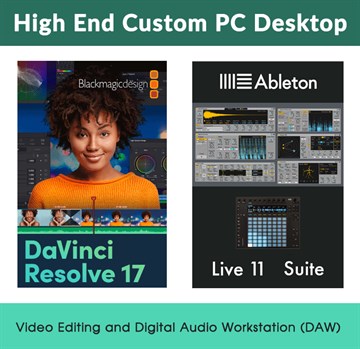
Best High End Custom PC Build for Ableton Live and DaVinci Resolve
Building a High End Desktop PC for Digital Audio Workstation (DAW) and 4K Video Editing and Effects Usage in 2022
 There are many factors to consider when building a new PC computer to act as a DAW (Digital Audio Workstation) or Video Editing and Effects Workstation. This guide examines the current state of desktop PC offerings for 2022, and some considerations for getting the most out of your money, for a fairly high end build. This guide is not meant to provide the absolute highest end components at any cost, but rather the best value and performance for your money in the prosumer segment of desktop pc components.
Target: ~$2300 for the core system before graphics card and optional add-ons. Final cost will vary depending on which graphics card you choose, or whether you go with onboard graphics, just focused on audio production.
While the applications I have targeted for this build are DaVinci Resolve, Fusion and Ableton Live, these general specs will work great for Adobe Premiere Pro, After Effects, Vegas Pro, Bitwig, Logic Pro, Pro Tools, Cubase, and other DAW and video software. In addition, with the optional specs provided below, the system outlined would work well for 3D development with Maya, Cinema 4D, 3DS Max, and others. In addition, though this system build is focused toward AV production, it would be a screamer of a gaming system, if you are looking for a build that can cover that base as well.
Your Custom PC Options
The first choice you need to make whether to buy a pre-built computer from a computer store, or to build it yourself from the individual parts. Here's the benefits and downsides for each of these two approaches:
Option A: Starting with a Pre-Built or Semi-Custom Configurator Build
++ The easy route. You select the basic model, customize what you can, and wait for your PC to arrive.
++ Saves you 2hrs to 5hrs of time, depending on your computer build and planning experience.
++ You may get easier access to hard-to-find components, like Nvidia graphics cards
-- You will certainly have to make some concessions in the parts available. You may not be able to choose an ideal motherboard or other components.
-- Custom PC builders or Pre-builts by the big brands often cut some corners on quality of components.
-- Most Pre-builts or Semi Custom builds are really focused on the gaming market, and not pro-audio or video editing focus
-- You will pay at least a small premium for components. Expect between 10-30% markup on components, sometimes more.
-- Overall cost will most likely be $200-$600 more, depending on vendor and specific parts chosen.
-- Your system may arrive with a bunch of bloatware software that you'll probably want to uninstall
Option B: Building a Custom PC from Individual Components
++ You will be able to choose the exact components you want for your build.
++ In the end, you'll have a system built from the highest rated, highest quality components.
++ You can focus your system on the needs of Pro Audio and Video Editing, rather than more general gaming systems.
++ Your system will be free of bloatware software and only have the drivers and software you choose to install.
++ You can shop around between Newegg, Amazon, Others to get the best prices on each component.
++ Overall, you'll likely end up saving $200-$600 depending on the build.
-- You'll need to do some research for components and compatibility before build. This guide may help you. :)
-- You'll need to build the system and install the O.S. yourself. Fear not, its a few hours of work, but actually fairly straightforward.
-- You may have a harder time finding available Nvidia graphics cards, though they are available at a markup on eBay.
It takes a small leap of faith to go the custom route, but I do recommend it. I hadn't built a completely custom PC from scratch since the days of 486/586/Pentium systems, and had memories of it being much more complex. Nowadays, it's a pretty straightforward and streamlined process, as long as you plan out your build a bit beforehand. I was actually surprised at how quick and easy the build came together.
The Unique Needs of a Modern Pro Audio Workstation or Video Editing Workstation
Here's a list of some of the needs of high end DAW and Editing stations, which you won't necessarily find on a lot of pre-built systems.
A. Lots of USB Ports:
If you are running a pro audio recording studio, with lots of instruments, you'll want a desktop with lots of access to USB ports/controllers. Some motherboards and computer cases limit your ability to have expansive USB connectivity and motherboard controllers. By choosing a motherboard with plenty of USB 2.0 and USB 3.0 ports built in, plus extra expansion headers, you can ensure that you'll be able to hook up all your devices, and strategically place them on separate USB controller chipsets on the motherboard. If you have dozens of synths, drum machines, effects, sub-usb hubs, MIDI hubs, cameras, external drives and other USB devices, you'll want to carefully plan out how each device is connected, and spread out the bandwidth to the motherboard, to prevent USB issues. Also, you may want a case that has room for additional USB bays on the front of the computer.
B. Lots of Fast Storage:
Both Video Editing Applications like Premiere and Resolve, plus DAWs like Ableton Live and Pro Tools will benefit from having lots of access to fast storage devices. In 2022, this means NVMe solid state drives and/or fast SATA SSD drives. For a high end system, you'll most likely want a 1tb NVMe drive for Windows and all your applications and VSTs. A secondary NVMe can be configured for your DAW and video project files, sample libraries, cache space for video editing and DAW, and possibly for storing high bandwidth video of current working projects. Having fast storage for key project assets will ensure you have a snappy/fast interface and can switch between sample based instruments with ease, and have snappy timeline scrolling with uncompressed or lightly compressed 4k video. NVMe drives do come at a premium cost for their sizes, so you may not be able to use them for all your video files. Also, if you're using H264 or H265, it's less important to have NVMe speed, since the compressed file sizes don't require the bandwidth, but instead just stress the CPU and GPU. A third SSD drive with high capacity is recommended for general storage of video files. And a fourth traditional SATA mechanical drive, or raid array may be appropriate for extra large capacity backup storage of video files.
C. Plenty of Memory/Ram:
Gamers can get by fine with 16gb or 32gb of ram, but for professional audio and video workstations, you'll likely want 64gb or even 128gb of ram. 64gb will probably be sufficient for most, however, if you are doing lots of visual effects work in After Effects or Fusion, you may want to go with 128gb of ram. The downside of installing more memory is that, in general, you'll have slower memory speeds. There's a very convoluted world of memory-processor-motherboard relationships that will determine how fast your memory can actually run, but the basics are that if you want the fastest memory setup, stick with using only two out of four memory slots on your motherboards (Slot 2 and 4), and purchase the ram with the lowest CAS timing, at a DDR MHz speed that is at the maximum of your motherboard/processor specifications for stable performance. More on this later.
D. Lots of Processor Cores and Threads:
Gaming systems are often more focused on super fast single core speed as a priority, with less of a need for multiple cores and threads - but for Pro Audio Workstations and Editing Workstations, you'll want to have lots of cores and processor threads available, while still having high clock speeds. In a program like Ableton Live, each track you have running will be allocated a separate core thread from the processor, unless there are no more threads left, and then a single core thread will be used for multiple tracks/busses, potentially adding latency and maxing out processor usage sooner. If you are creating sessions with 16+ tracks and using lots of VST plugins or complex effects racks and busses, you'll want to get lots of cores/threads for your processor choice. Also, in an editing or video effects program like DaVinci Resolve/Fusion, or Adobe Premiere / After Effects, the multiple cores/threads are used to improve performance. In 2022, you've got lots of great options from both AMD and Intel. For my recent build, I decided on a 16 core, 24 thread Intel i9 12900k. The AMD 5950X is also a good option for high end processor, in the Prosumer segment.
E. Other Key Components:
Of couse the Graphics Card will be a key component to any high end Video Editing and Effects Workstation, though these cutting edge video cards are pretty much desired by every desktop purchaser, as high end gaming has similar needs for the latest graphics capabilities from nVidia or AMD.
Planning the Build and Components
The first thing you will probably want to do is decide on a Processor, Motherboard and Memory combo. As mentioned above, for 2022, the latest 12th generation Intel i7/i9 Alder Lake processors or AMD Ryzen 59XX series processors represent great performance for modern DAW and Editing Workstations. There are even higher end models like the Intel XEON series, but you're really pay a premium for those. I chose these items:
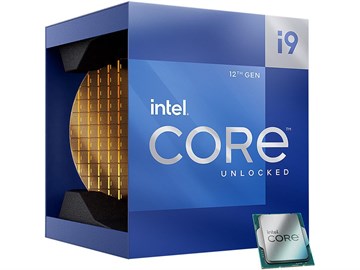 1. Intel i9 12900k Processor. $619
This is 12th generation technology, with 16 cores, and 24 threads, using Intels new performance core and efficiency core paradigm. These processors represent great quality and value at the high end of prosumer market. Also available in the 12th generation Alder Lake series are several other i9, i7 or i5 processors with more modest specs and fewer processor cores. These all represent good value for their performance.
For a high end workstation that will excel with both audio workstation duties as well as 4k video editing, I went with the top of the line i9 12900k. Note that this version also has onboard graphics processing, in case you ever need to or want to just use the onboard graphics. As an alternate, AMD also makes many very good prosumer grade processors. You can check out their Ryzen 59XX series processors for comparable specs and value to the Intel 12 gen processors. (though note that the below items are all matched to this Intel processor)
2. MSI MAG Z690 Tomahawk DDR4 Motherboard. $249
 The Z690/LGA1700 architecture is the appropriate type of motherboard you want if selecting an Alder Lake processor like the i9 12900k listed above. At the time of purchase, DDR5 memory is nearly impossible to find, and scalpers are charging huge markups, so I decided to go with a DDR4 based board, which still has great memory speed capabilities, but is much more available. As time goes by and DDR5 memory is more available, and at standard MSRP, I would recommend looking at a DDR5 motherboard. It's important to know that they are not interchangable, so you have to make a hard choice when deciding on the motherboard.
The other reasons I chose the Tomahawk DDR4 is there is a Lightning Gen 5 PCI-E slot for future compatibility with next gen graphics cards (while still having backward compatibility with PCI-E 4.0 cards) Also, there are additional PCI-E x16 slots - I use a Blackmagic PCI capture card which requires one of these slots... and leaves one free for future PCI-E x16 expansion. The Tomahawk DDR4 also has four M.2 NVMe storage slots directly on the motherboard, so you can add tons of high speed storage, and six SATA ports as well for additional SSD drives, optical Bluray drive, and future expansion of drives or RAID arrays. In addition, this board has ample USB ports on the rear, plus multiple USB 3.2 and USB 2.0 headers which can be used to add expansion USB ports. MSI has good BIOS options for overclocking as well, and generally good support and history.
3. G.Skill TridentZ DDR3200 Memory 64gb (2x32gb) (Model F4-3200C14D-64GTZR) $379
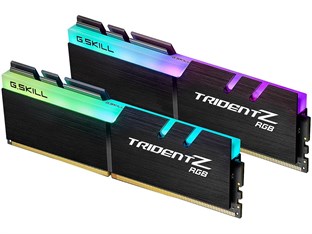 This is actually a situation where I purchased the DDR4000 Memory with 128gb kit (4x32gb), thinking that faster and more would be better, but actually that is not the case necessarily. There is a whole nebulous world of overclocking and memory tuning that can be used to optimize memory speeds, but I didn't realize before purchase what the implications were. Long story short is that 4000MHz speed is not really supported in the configuration and current capabilities of the processor and motherboard. 3200MHz is really the best case scenario, and even that can only be accomplished with just using 2x32gb memory sticks.
You'll most likely want to only use two out of the four memory slots if you want the best memory speed and latency. With the 4x32gb configuration I purchased, the highest supported speeds are in the 2667-2900MHz range. I may still use the full 128gb at this lower speed, but in hindsight, if I were to do it again, I would choose the G.Skill TridentZ 2x32gb kit at 3200MHz, with lower latency / CAS timing specifications (14-18-18-38). This 3200MHz kit of 2x32gb would represent a best bet for high speed / low latency memory with the motherboard/processor configuration.
4. Storage Devices - NVMe and SSD $528 or $1257 with optional 8TB SSD
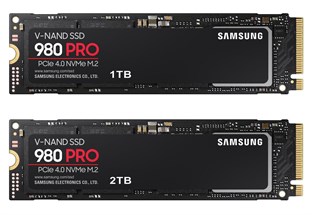 a. Samsung 980 Pro NVMe SSD (1TB) $179 - This is the primary system drive, which will have Windows 11 Pro installed, plus Ableton Live, DaVinci Resolve, and various other AV programs and utilities. 1TB will give plenty of space for the main system drive, and give the option to use it for caching data.
b. Samsung 980 Pro NVMe SSD (2TB) $349 - This is the secondary drive that will house all Ableton Live and Video Editing Projects, plus Sample Libraries. In addition, it can be used as the main cache for programs, and used for short term storage of high bandwidth video or high res proxies for current projects.
c. Optional: Samsung 870 SVO SATA SSD (8TB) $729 - This is a SATA drive, so its a bit slower than NVMe drives, but still very fast and silent solid state. This drive is used for housing the majority of video files for editing projects. Large 8TB capacity will house a good amount of 4k content.
x. You can add additional storage if needed, such as extra high capacity traditional SATA drives or RAID arrays for backups. The motherboard in this build can handle four M.2 PCIe drives, and six SATA drive devices. Also, the case has plenty of room for expansion drives - so you have lots of capability to add storage now or later.
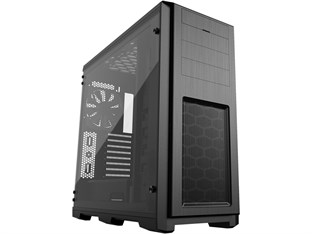 5. The Case - Phanteks Enthoo Pro TG PH-ES614PTG_BK - $110
There are many choices when it comes to cases. With Pre-Built and Semi-Custom computer builders, they often focus on flashy form before function. There are some seriously crazy cases available nowadays, with some looking like abstract art or alien spaceships. For this high end Audio/Video workstation, the focus is on function first though. The primary focus is on great cooling performance options, expansion capabilities, and space for high end components.
This Phanteks Enthoo Pro case features three front expansion bays, which can be filled with a Blu-ray drive, a USB 3 Expansion bay, and a USB 2 Expansion bay/hub. In addition, it has ample cooling capabilites, space for expansion of many extra SSDs or traditional hard drives, and plenty of clearance for current and future high end video cards. You can still make it look flashy with color LED lights, if that's important to you.
6. The Power Supply - Seasonic FOCUS GX-1000, 1000W 80+ Gold, Full-Modular - $140
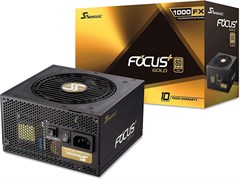 It's not a sexy item, and sometimes gets overlooked when spec'ing out computer system, but the power supply is the beating heart that provides the electrical blood to your processor, motherboard, graphics card and all devices. Getting a great power supply ensures you will not only be good for the short term, but you'll have long term system stablity, and the ability to expand the components later with new video cards or other devices which have higher wattage requirements. At a minimum, for a modern, high end AV workstation, you'll want 850 Watts, but I recommend 1000 Watts or more. This Seasonic is extremely highly rated and represents a good value. This is one of the items that is often marked up a bunch by custom build configurators, or they will often skimp on quality, knowing that most people ignore the importance of a good power supply. Get a good PSU from from the start and your computer will have a longer, happier, more energetic life.
7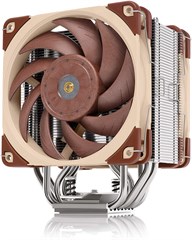 . The CPU Processor Cooler - Noctua NH-U12A - $110
At the time of writing this in early 2022, you'll want to make sure whatever cooler system you purchase includes compatible mounting hardware for LGA1700 architecture processor. You can choose to go with a water cooling system or a traditional fan cooling system.
After a bunch of research, I found that there is a small advantage to going with a water cooler system, however it is a bit more complex to install, and potentially doesn't have the same sort of longevity and peace of mind as a cooler that doesn't include liquid near your expensive electronics. If you choose a traditional cooler like I have, I highly recommend this Noctua NH-U12A. It offers great, high end cooling performance, quiet operation, and easy installation process.
8. The Operating System - Windows 11 Pro - $150
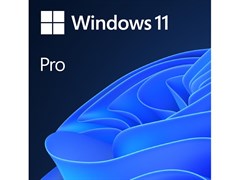 You can start with Windows 10 Pro, though I recommend just starting with the newer Windows 11 Pro, as it has additional features to take advantage of the new Intel Alder Lake 12th Generation processors which have both performance cores and efficient cores. Win 11 Pro will offer the best usage of the threads. After using it for a couple weeks, it seems very stable and ready for prime time. All of the progams I use work great on it, including Ableton Live 11, Resolve 17, OBS Studio, Komplete, Behringer Wing, MIO10 and MIOXL interfaces, and all other peripherals and programs.
Cost for the Core PC Desktop System: $2285
If you tried to put together a system with these specs from a pre-built or semi-custom computer builder, you would likely have to shell out closer to $3000, if you could even get the builder to let you select the exact components. These components have all been picked because they are the highest rated components on the market and represent great performance and value without cutting corners.
Now, onto the Graphics Card and Optional Components:
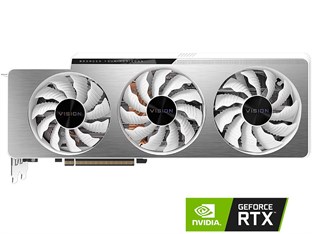 9. The Graphics Card - Gigabyte RTX 3080Ti Vision 12gb - $2100 from Scalpers, $1,200 MSRP
This will be one of the most expensive items you add to your build, and you may choose to go with a more conservative/inexpensive option here. Currently, due to high demand + crypto mining, combined with a global shortage of semiconductors and supply chain issues, all the good graphics cards are sold out and immediately purchased by scalpers (or greedy computer builders) and marked up for resale, adding 20-60% or more of their intended MSRP cost. I bit the bullet and went with the 3080Ti, as I will be using this system for lots of 4k Editing in DaVinci Resolve, and Fusion Effects. Resolve takes advantage of GPU processing for many of its effects processes and encoding/decoding compressed H264 or H265 video.
This card is currently in the $2100 range, only available from scalpers, unless you get lucky at Best Buy or another retailer. If you're not doing video editing and effects, and just focused on Audio Workstation needs (Ableton, Protools, Bitwig, etc), then you can certainly get by with a cheaper graphics card. I recommend looking at RTX 3060 series instead, as this is still a high end, modern graphics card, but you can get them for around $500, rather than the $2k you would spend for the 3080Ti. For DAW use only, you could even just stick with the onboard/integrated graphics system from the 12900k processor and motherboard, and wait to add a dedicated graphics card later, when they come down in price, closer to MSRP.
Alternatively, if you really want to go premium and plan to edit 6k or 8k content, you should consider the RTX 3090 GPUs. They will double the cost of the system build, but they represent the best available GPUs for DaVinci Resolve and Fusion.
10. Extra Add-Ons - USB and Blu-ray - $131
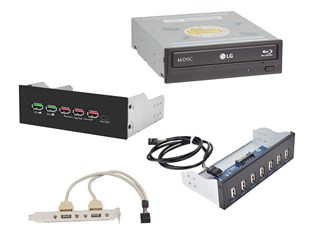 a. LGA WH16NS40 Bluray Reader Writer Optical Drive $59 - This is a great, inexpensive Bluray drive which will make it easy to install Operating System, consume DVD/Blu-ray content, or make optical backups.
b. EZDIY-FAB USB 3.1 Gen2 and Type-C 5.25in Expansion - $42 - This will attach to the internal USB C Expansion header (instead of wiring it to the Phanteks case. It will give additional USB 3 and USB C ports on the front of the computer for easy connection of additional devices, cameras, and high speed flash readers.
c. Fo Sa USB 2.0 HUB 5.25 Inch Expansion - $21 - This will be installed in the lowest open expansion on the front panel, giving you easy access USB 2.0 hub from the front of the computer. This will attach one of two free USB 2 expansion ports on the motherboard.
d. Sinloon USB 2.0 Rear Panel Expansion - $9 - This internal, rear panel expansion will be attached to the other USB 2 expansion port on the motherboard, ensuring you have access to all available USB connections to the motherboard.
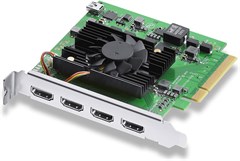 11. Blackmagic PCIe Decklink 4 HDMI 4k Capture Card $545
I already had this in a previous computer, so I ported this over to the new system. It's great for attaching multiple studio cameras for OBS recording/streaming or general 4K capture. If you have DSLRs or modern mirrorless cameras with HDMI output, you can hook them up directly to the Blackmagic Decklink, and have easy access to directly capture high quality 4k video with Blackmagic's software, or use a program like OBS (Open Broadcasting Software) to do live streaming with multiple different scenes and video compositions that you can cut between in real time.
High End Video Production Workstation Options:
Additional $3505 to add on all the listed optional components, at current real world / 2022Q1 scalper prices, including extra 8TB SSD, Blackmagic 4x4k HDMI Capture Card PCIe, and the incredibly powerful nVidia Gigabyte RTX 3080Ti Vision graphics card. As availability of nVidia cards improves, they will hopefully return down to their MSRP prices, which would cut a significant amount off the price. Some of these items might be overkill it you're not doing 4k video editing, but if you are, then I recommend them. For just an Audio Workstation, you can either use the built in / onboard graphics from the processor/motherboard, or go with a RTX 3060 or even previous generation GTX 1070 or above would be plenty sufficient - and cut $1500 off the price for optional components. Plus, if you're not doing live capture/streaming/recording of HDMI 4k, you can skip the Blackmagic capture card, and the 8TB SSD addition, and just go with a smaller SSD, or traditional SATA drives, which are far cheaper and higher capacity, while still working fine for audio workstation needs. So, if your focus is just on Audio workstation, go with the Core Build for ~$2285, plus the USB/Bluray options for $131, a graphics card in the $300-$500 range, and $200 or so for additional work file storage. You can come in under $3k for a super charged audio workstation, that is also capable of solid UHD 2k video editing, and some occasional 4k video editing work.
The Build Process
Once you receive the components, you are ready to build your PC. If you are experienced in desktop building, this may take as little as 60-90 minutes, but if you have little or no experience, expect it will take 2-4 hours. Below is the Steps, the DIFFICULTY of each step, and estimated time, if you're fairly handy.
Step 1: Install the Processor onto the Motherboard. EASY, 5-10 Minutes
Just follow the instructions with the motherboard and processor. Unclamp the LGA 1700 socket, take out the plastic protector, align the processor into the slot and carefully lay it in, making sure its aligned, then clamp it down with the motherboard clamp.
Step 2: Install the Motherboard into the Case. EASY, 15-20 MInutes
Modern ATX cases and motherboards have perfectly aligned mounting systems. You'll just want to check the mounting positions listed in your motherboard manual, line up the motherboard gently on the correct screw holes, and carefully screw in the 9 screws that hold the motherboard to the case.
Step 3: Install the Memory Sticks. EASY, 5-10 Minutes
Assuming you go with the 2x32GB memory stick configuration recommended above, you just want to take out the sticks and check the pin alignment on the motherboard. They will only go in one direction. Make sure the DDR clamps are open (the clamps at the end of the memory slots should be slightly angled out and a bit loose) Install the two memory sticks in Slot 2 and Slot 4 (*important, make sure you get the right two slots. The slot closest to the processor is Slot 1, so skip that one and install the first memory stick in Slot 2, then next in Slot 4) Gently push them down into the slots ensuring both sides get fully seated down into their slots. You might hear a subtle sort of click sound as the end clamps lock in place, or not. You may want to gently push the end clamps in toward the memory stick as you push them down into their positions. Just ensure both memory sticks are securely seated.
Step 4. Install the NVMe Drives, Sata SSD or Other Drives. EASY, 10-20 Minutes
Unscrew the included NVMe heatsinks from the motherboard that cover the NVMe slots. Put the System Drive NVME (1TB) in the first M.2 slot, and the second NVMe (2TB) in the second M.2 slot. They are installed by gently angling them in at a 30 degree angle or so, and then gently pushing them down and in until they rest on the included screw header on the motherboard. Mounting screws are included with the motherboard - just read the instructions. After you have the NVMe drives screwed in secure, put the heatsinks back on the motherboard and screw them down until they are medium tight and make good contact with the back of the NVMe drives for heat dissipation. Next, install any additional SSD, Bluray or other drives you want. Refer to the case manual to determine optimal locations. The case recommended above has many possible locations for expansion drives. If installing a Bluray, I recommend using the top expansion slot on the front. After installing the drives, go ahead and connect up the SATA cables included with the motherboard to the drives. Two SATA cables are included with the motherboard. You can purchase more if needed. Use whatever SATA ports on the motherboard are most convenient, and will not get in the way of other devices.
Step 5. Install the CPU Cooler and Case Fans. MEDIUM, 15-30 Minutes *Note: If case doesn't provide rear access, do this after step 1
Installing a cooler on the CPU is vital to performance and to prevent overheating of the processor. A liquid cooler system provides the highest level of cooling, through modern fan radiators are not far behind. Both types of cooler systems require a bit of careful planning and patience to install properly. A liquid cooling system required installing two components - the processor mounted cooling unit, and the larger radiator fan unit somewhere in the top or front of the case. For a traditional fan radiator, you just install the single unit on the processor, and it will tend to be a larger assembly - though that works fine in this case recommended, as its got plenty of room. To install the unit onto the processor, you'll want to follow the instructions provided. First you'll install the rear support brackets as indicated in the instructions. (this case has a wide opening for access). Most cooler units include thermal paste, but if not, you may need to look into purchasing that separately. You will follow the instructions to apply the correct amount paste to the top of the processor (five squeezed dots with the above recommended configuration). Next, attach the CPU cooler onto the processor and tighten down as outlined in instructions. Next, connect the Fan and/or Liquid Cooler Pump connections to the motherboard fan/pump connectors and/or case fan hub. This Phanteks case has a hub that can be connected to multiple system fans, including the two provided in the case. I recommend attaching the Phanteks fan hub to the System 2 Fan port on the motherboard, and using the CPU fan port to the CPU radiatior fan.
Step 6. Install the Power Supply and Make Appropriate Power Connections. MEDIUM, 20-40 Minutes
Follow the instructions in Case and Power Supply Manual to determine how to install the power supply. For the above recommended items, you remove the power supply shield from the case (unscrew 3 screws), and then mount the power supply in the bottom rear. It just take 5-10 minutes. The connection of the power lines takes a bit more time, as you'll want to consider the optimal route of each power cable to motherboard, drives and other devices. This motherboard will take three connections from the power supply. The big 24 pin connector, plus two 8 pin power connectors near the top. Each SSD, Bluray or other SATA drive will need to get power from the peripheral power lines on the supply, and if you are installing a high end graphics card, you'll probably want to connect one or two of the PCI-E power lines to where your graphics card will sit. (consult your graphics card manual for power needs) The 3080Ti outlined in this article uses two of these power connectors. All of these connectors are included with the power supply. Take your time to make sure you don't create a spaghetti mess of cables, and use zip-ties if possible to organize the cables.
Step 7. Install the Graphics Card. EASY 5-10 Minutes
If you're not using the onboard graphics from the processor / motherboard, you can install your PCIe Graphics Card next. This case outlined above has plenty of clearance for the largest of cards so you should have plenty of room. To install, remove the screws from the back plate(s), and remove the rear guards for those slot(s). For most modern cards, they will take up the space of two slots. Align, and gently push the graphics card into place into the top PCIe 5.0 slot (closest to the processor). Make sure the card is fully seated down in the slot, then put the two screws back in the rear plate to secure the card in place. Next, connect up the one (or two most likely) PCI-E Power lines to the top of the graphics card.
Step 8. Install Additional Accessories, Lighting, Case Connections. EASY 10-30 Minutes
If you have purchased the extra USB expansions outlined above, install the USB 3.1 and USB 2.0 hubs in the 5.25in expansion slots under the Bluray drive. Install the extra USB rear panel expansion into on of the open PCI slots. Make the connections to the motherboard USB expansion ports. Just look at the motherboard manual to figure out which ones they are. The front USB 3 hub expansion will use the USB C internal port, while the other USB 3 expansion will be connected to the case USB panel... just refer to the instructions for the case. Note: the Single USB C in the case port will not be active, however all other USB ports will be active, and the expansion bay will give you a C port, plus some Type-A ports, for maximum connectivity options. If you have purchased any RGB light strips from Phanteks or other case strips, you can connect them as indicated in the case manual. In addition to the USB 3 to case connection, you'll need to wire the power on connector and hdd activity connector to the appropriate motherboard pins... just refer to the manual for where it gets plugged.
Step 9: Connect Monitor, Mouse, Keyboard, Ethernet - Time for BIOS Setup and Windows Installation. MEDIUM 5-20 Minutes
You're ready to fire it up for the first time.... connect keyboard and mouse to the two USB 2 ports on rear top of case. Cross your fingers and toes and press the power button ;) If all went well, the computer will boot up to BIOS for the first time. In the BIOS, go to your Advanced Hardware page, and setup the fans for the CPU and System Fan 2 (assuming you connected the Phanteks to that port), to run in PWM mode... just click in the PWM box. You can adjust your fan curves in smart mode to reduce fan noise, but may want to leave that for later. On the main BIOS screen, adjust the Boot to put the Optical/Bluray drive before the Hard Drive, and insert the Windows 11 Pro installation disk in the Bluray drive. Next, Save and Exit BIOS (F10, Yes) Windows Setup will boot from the Bluray drive. Follow the prompts to install Windows 10 Pro.
Step 10: Install Windows Drivers. EASY 10-30 Minutes
Start with Motherboard Drivers - If your motherboard included drivers on USB or DVD, you can install them from that device. You will want to go to the Motherboard website, find the specific drivers for Win 11, and download and install them. Get the core motherboard drivers, networking drivers for internet access, Realtek audio drivers, and other essential drivers for USB or other peripheral components on the motherboard. Install all of them one-by-one. You many need to reboot after certain installs. Continue this process until all motherboard drivers are installed, then continue on to install storage device drivers (ie: Samsung Magician with latest drive firmware), install Graphics Card drivers from nVidia or AMD. If using a modern GTX/RTX video card from nVidia, you will install GeForce console first, then be given the choice to install Game Ready Drivers, or Studio Drivers. If you are using the system as an AV workstation primarily, use the Studio Drivers, as they will give you the best stability and performance for AV productivity. Next, install any additional drivers for PCI peripherals, such as Blackmagic Capture cards or other devices like that. Once all the core hardware has the latest drivers, then go to Windows Update (search for update), and let Windows download and update any/all updates for security or performance. This may take a few rounds of updates, reboots, and rechecking for more updates. Repeat the process until Windows says "No more updates available". Now you're ready to install your applications - Ableton Live or Pro Tools or Bitwig or Logic. DaVinci Resolve. etc.
Step 11: BIOS Tuning and Overclocking. EASY 5 Minutes (If Defaults Work), HARD Lots of Time if Doing Custom Tuning
You can leave everything stock, but if you want the absolute best performance, you will want to engage some options in BIOS for overclocking. Reboot the computer and hit the DELETE button a few times when its first booting up, before Windows loads. This will enter BIOS. For the above mentioned MSI motherboard (and other similar MSI boards), in the upper left, you'll see two options for CPU Game Ready Overclocking and XMP. If the system is setup as specified above, you should be able to click both of those modes on, and save/exit BIOS (F10), and the default overclocking for CPU and XMP memory should activate the best option for overclocking, while still maintaining system stability. If the system gives a message that the XMP overclocking failed, you may need to do some further research on advanced DDR memory settings. Optimally, you will be able to run 64gb (2x32gb in slots 2,4), at 3200MHz, in Gear 1 ratio, and with the timing specs from the memory you purchased. (ie: 14-18-18-38) That should give you the best available memory speed, latency and total memory available for this configuration. Note: You can go with a 128gb DDR4 setup (4x32gb), though you will end up sacrificing some speed and latency... most likely having to settle for 2667MHz at Gear 1, with slightly more CAS and effective latency.
Get Creative!
There you have it. A complete build guide for a high end prosumer range custom PC to act as a Digital Audio Workstation and Video Editing Workstation.
I have been running Ableton Live 11 Suite, with all the Packs, a huge array of Komplete/Kontakt Sample instruments, tons of VSTs from Arturia, NI and others - and this system configuration offers screaming fast performance. Ultra quick switching of instruments and sample libraries, and has no problem with huge projects of a dozen or more tracks and lots of VSTs, samples and effects running. Also, it works great for DaVinci Resolve 4k editing and Fusion effects compositions with lots of nodes.